![[object Object]](https://s3.us-west-2.amazonaws.com/worklenz.com/assets/worklenz-light-mode.png)
![[object Object]](https://s3.us-west-2.amazonaws.com/worklenz.com/assets/worklenz-dark-mode.png)
How to create a sub-task
Sub-task
A sub-task lets you break down your main task into smaller, manageable units of work. You can create sub-tasks to organize minor activities under a main task.
Create a sub-task
There are two ways to create a sub-task:
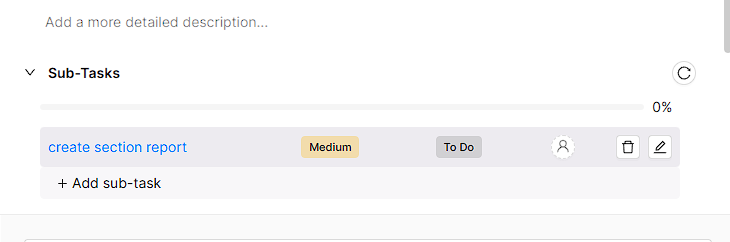
1. From the task drawer
- Open the task drawer by clicking on a task.
- Navigate to the Sub-tasks section.
- Click the Add sub-task button.
- Type the sub-task name and press Enter.
- Click on the sub-task to open it and add or modify details, similar to a normal task.
- You can have up to 3 levels of nested sub-tasks.
2. From the task list view
- In the task list view, click the > icon before the task name on the main task.
- The Add sub-task option will appear.
- From here, you can add a sub-task in the same way as creating a normal task - type the name and press Enter.
Identify tasks with sub-tasks
- In the task list, you can identify tasks that have sub-tasks by the number indicator shown on the right side of the task name row.
- Click the > icon on the left side before the task name to expand and view the sub-tasks.
Sub-task details
When you open a sub-task, you can configure it with the same attributes as a normal task, including title, status, phase, assignees, due date, time estimation, priority, labels, billable, description, dependencies, attachments, and comments.
Note: The parent task’s progress is automatically calculated based on the sub-task progress and status.